Channels contain all the information required to take the data and keep a part of that data in memory for display and analysis. Fortunately, once you setup the parameters of a channel, you only need refer to the channel by name throughout DAQFactory. Channel parameters are stored in a Connection, typically Local.
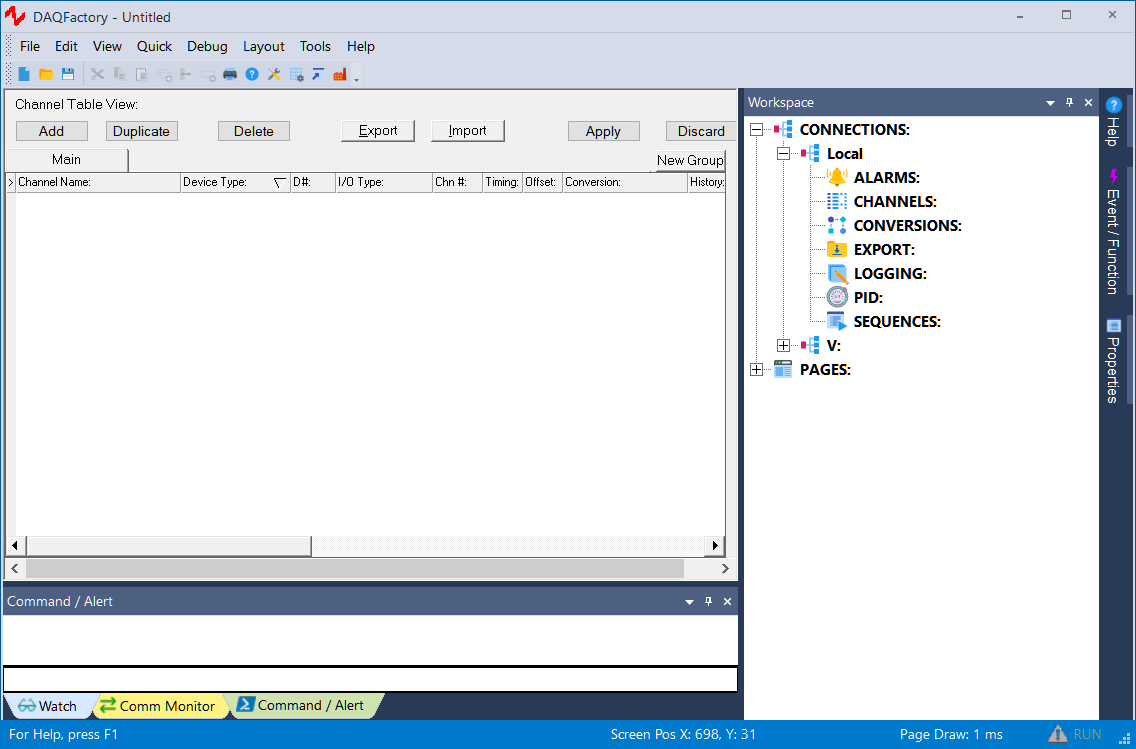
· To display the channel table, simply click on the word CHANNELS: under the connection Local in the workspace. The view will change and display the channel table.
· To add a new channel, simply click the Add button. This will create a new row in the table. Here you can fill in the details for the new channel.
· To enter multiple channels quickly, use the Duplicate button. The Duplicate button will also create a new row, but copies all the data from the current row (the one marked with the > and highlighted in yellow). The channel number is automatically incremented by one each time the Duplicate button is pressed. The channel name column is not copied unless the channel name ends in a number, in which case this number is also automatically incremented with each Duplicate press. The Quick Note column, which is often used for addressing special devices is duplicated, and if it ends in a number, that number is incremented as well. This makes it very easy to enter multiple channels quickly.
· To delete a channel, select the row with the channel by clicking on it. The selected row displays in yellow with a > mark along the left of the table. Once the desired channel is selected, click the Delete button to remove it.
None of your changes are permanent until you click on the Apply button. If you don't want to keep your changes, click the Discard button instead.
The channel table rows:
Each row of the table corresponds to a single Channel and has several columns.
Channel Name: This contains the name of this channel which will be referenced through DAQFactory for displaying and analyzing data. Like all names in DAQFactory, the channel name must start with a letter, and contain only letters, numbers and the underscore. DAQFactory will prompt you when applying your changes if you have any invalid channel names. We suggest using a descriptive name. Consider either separating multiple word names with an underscore like: Inlet_Temperature, or using upper lower format like: InletTemperature.
Device Type: Here you will select the type of hardware device. The list of possible choices depends on what device drivers are installed on your system. Typically, these refer to a hardware manufacturer, or special type of I/O (like Serial).
D#: This refers to the device number. Only certain device types use this parameter. Refer to the documentation on your particular device type to determine the appropriate values.
I/O Type: This helps define the class of data being received and has different meanings depending on your device. For example, most DAQ boards will have "A to D", "D to A", etc.
Channel #: This specifies the exact I/O channel number. Again this is device type specific, but typically refers directly to the channel described on your hardware's pinout. Some devices, OPC for example, do not use this parameter.
Timing: The timing value determines how often an input channel is read. For output I/O types it has no meaning and cannot be entered. The units of timing are in seconds. You can enter a value of 0 for timing, in which case the channel will only be read when the channel's read() function is called or through other device specific methods.
Offset: There are cases when your hardware I/O might be somewhat slow. In this case, you probably do not want to hold up your other I/O for this slow hardware. By providing an offset value for your slow hardware you can have all your data read at the same timing interval, but stagger the reads in a predictable manner to allow the slow hardware to finish without holding up the fast I/O. For example, you could set all your fast I/O channels to a timing value of 1.0 and an offset of 0.0. Then you would set your one slow channel to a timing of 1.0 and an offset of 0.1. This way your fast I/O will always occur right on the second, and your slow I/O will not start until 100 ms later, which should give you fast I/O time to complete. The units for this column are also in seconds.
Conversion: Conversions allow you to put your data into more useful units. Conversions are discussed a little bit later on. In this column you will select from the list of available conversions, or select None to leave your data in raw form. Remember, you can always put your data in just about any units from within DAQFactory as well.
History: To allow you to display graphs and do data analysis, DAQFactory keeps a history of the data from all your channels in memory. Unfortunately, computers do not have an unlimited memory, and rather than assume some arbitrary limit to the amount of data that is remembered, the history column allows you to specify the number of data points that are kept in memory. You can therefore set the history amount to a large number for your important channels and a smaller number for the less important channels. As a reference, each data point within DAQFactory uses 16 bytes of memory. So a history of 86400, or a days worth of 1 hz data, will take just under 1.4 meg of memory. The same is true for image and spectral data, except that you have to multiply the history by the number of data points per spectrum or image. All memory is allocated as soon as the first data point is added to the channel. Use this in combination with Persist to extend the amount of data available to your graphs and calculations.
Persist: In addition to the history and separate from data logging, you can opt to keep a larger amount of historic data from a channel on your hard disk for easy retrieval. The Persist field specifies how many data points are kept on disk. Since hard disks are significantly larger than RAM, you can make this number very large and thus have quick access to lots of data. Please see the next section on channel persistence for a more thorough discussion of this parameter and how it works with History. This parameter is optional and defaults to 0, which means only the channels history in memory is used for graphs. Note that channel persistence does not work with string, spectral or image type data.
Avg?: If this is checked, then the data being stored to disk will be averaged first. This is a simple way to reduce the amount of data being stored without ruining the precision of your measurements. The amount of averaging is determined by the next column.
# Avg: This column determines the number of data points that will be averaged before the average is stored. The average is a boxcar average, not a running average. This column can only be edited when the previous column is checked.
Quick Note / Special / OPC: This column can have different meanings depending on the device type and I/O type specified. For most channels, the column simply contains the Quick Note where you can specify short details about the channel. For some I/O types on certain legacy devices, an ellipsis (...) button will be displayed. If you click on the ellipsis, a dialog will appear allowing you to set certain parameters for the channel. The Command I/O type will almost always have parameters. See the documentation on the device driver for more details on exact commands. For OPC devices, an ellipsis will also appear. Clicking on this will open a dialog that allows you to browse for your OPC tags. Once selected, the tag will be displayed in this column in the format: server;host;tag. You can always manually enter these values in the table. Please see the section on OPC for more information. Other devices may use this column for other channel specific details.
Mod Slave #: If you are using the Modbus Slave protocol, this assigns a particular Modbus address to the channel. Please review the section on the Modbus Slave protocol for more information.
# Hst: If your memory is limited but you still need to be able to keep a long history, you can set this column to a number larger than 1. This column tells DAQFactory how often to update the history of this channel. If this column contains 10 on a 1 hz channel, then the history will contain a bunch of points separated by ten seconds. The latest data point is always kept in the history (i.e. at subset [0]).
Brd?: This determines whether the channel data is broadcast to remote copies of DAQFactory that are connected to this copy of DAQFactory using the slim data stream. This is discussed more in the chapter on networking. This also determines if the channel data is broadcast on DDE. DDE must be enabled through Document-Settings first. See the chapter on networking for more information.
# Brd: In low bandwidth applications, or any application where you want to reduce your network load, you can set the interval in which data is broadcast to other copies of DAQFactory. A value of 1 for this column results in all data being transmitted. A value of 0 results in no data being transmitted even if connected via the full data stream. A value of 2 results in every other data point being transmitted, and so forth. No averaging occurs, and this has no affect on the data storage. This affects both the full and slim data streams.
Group: This determines which group the channel belongs to. Channel grouping only affects how the channel table and workspace are organized and have no effect on the rest of DAQFactory. Using channel groups is discussed in the section on Channel Groups.
Additional channel parameters exist that can only be edited in the Channel View.
Once you have entered all your channels, or have made any changes to existing channels, make sure you press the Apply button to start taking data. Press the Discard button to ignore any changes and revert back to the page view. If you forget to click Apply and try and switch to a different view, you will be prompted to apply you changes.