Once installed, and if necessary, rebooted, you’ll want to quickly make sure your new device can be found, and set its ID. This is done with the LabJack tool Kipling which is installed with the LabJack drivers from LabJack. It is not part of DAQFactory. If you are going to connect over Ethernet, we strongly suggest you perform this step over USB first:
Note: these directions are for software created by another company and so may not be completely accurate. Visit the LabJack website for further help with this part if needed.
1) Plug in your new device into a USB port.
For maximum capabilities, we recommend plugging into a USB port directly on the computer or to a powered USB hub. If you plug into an unpowered USB hub, you may run into sourcing limitations. This can also occur if you have multiple devices plugged into the hub, even if it is powered.
2) Go to Start – Programs – LabJack – Kipling.
The complete documentation for this program is installed with the LabJack driver, but there a few more steps to perform before starting DAQFactory.
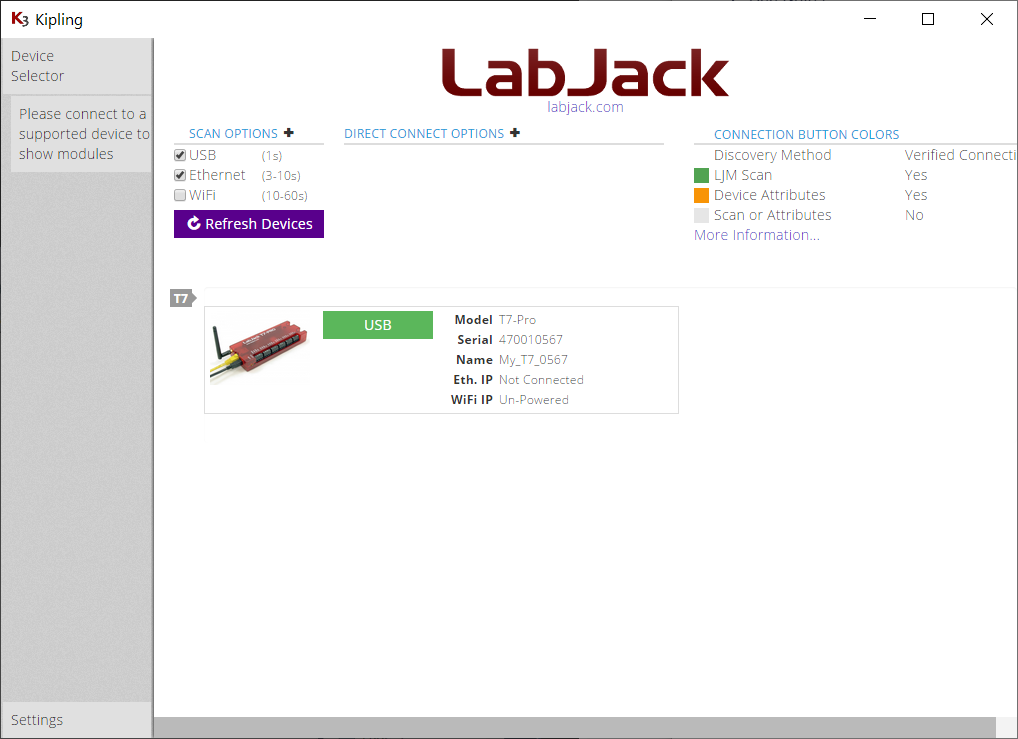
3) The program will automatically search for devices when it starts. For example, in the image above, a T7-Pro was found on USB. If you do not find your device, adjust the settings, check your cables and Click on Refresh Devices.
If your device is not found after refreshing, you should refer to the LabJack User’s Guide for more assistance.
4) Once found, click on the connection name in green next to the device. In the image above it is labeled USB.
This will display a bigger menu on the left to allow you to view various details of the device. You may want to click on Analog Inputs to get to the test panel just to see that you are receiving signals.
5) Write down the serial number of your device. It is also usually on the label on the back of the LabJack device. If you are connecting over USB and have more than one device you will use this value to distinguish between your devices.
If you are using multiple LabJacks you will need the serial number of each device. Zero is used by DAQFactory to indicate “First Found”. If you are using Ethernet, the ID is not required.
6) If you are planning to connect over Ethernet or WiFi you will want to give the LabJack a static IP address. IP setup is more complicated than USB but once setup is more reliable. However, when you are getting started we strongly recommend connecting over USB first and make sure everything works, then switch over to Ethernet or WiFi.
Leaving the LabJack in DHCP mode will cause problems as DAQFactory, or really any tool, will use the IP address to connect to the device. Under DHCP it is possible that the LabJack will arbitrarily get a different IP. This doesn't happen often, but it DOES happen. Some routers support a way to set your router to prevent this while still having the LabJack on DHCP, usually by telling the router the LabJack's MAC address, but setting that up is outside the scope of this document.
If none of the above is clear, think of it this way. The IP address is the LabJack's phone number. With DHCP the phone number (IP address) is assigned by the router, and the router can at any time decide to give the LabJack a different phone number. DAQFactory won't know this happened and so will be dialing a wrong number and you will lose communications. Assigning a static IP address prevents this as long as you don't give another device the same IP address (phone number).
Note: you should close Kipling to use your device in DAQFactory to avoid any conflict.